Step-by-step Guide to Building a Simple Electric Motor for Beginners

You can build a simple electric motor even if you’ve never tried before. This hands-on project makes science fun and easy to understand. Check out the table below for cool activities that help you explore electromagnetism while working with small motors for projects.
Activity Name | Description |
|---|---|
Creating an Electromagnet | Build an electromagnet and see how its strength changes with configuration. |
Get Your Motor Running | Make a simple electric motor using batteries, magnets, and wire. |
Ultra Simple Electric Generator | Follow steps to build a generator and learn about electromagnetism. |
Simple Electrostatic Motor | Create a motor with pop bottles and learn electric motor principles. |
Many educational resources, like The World's Simplest Motor™ kit, give you step-by-step instructions and encourage you to observe and predict as you experiment.
Key Takeaways
Gather essential materials like copper wire, AA batteries, and a neodymium magnet to build your simple electric motor.
Follow the step-by-step instructions carefully to ensure your motor spins correctly; check connections and sand wire ends for best results.
Consider using INEED micro motors for advanced projects; they offer customization and efficiency for various applications.
Materials for Small Motors for Projects

Before you start building, you need to gather the right materials. You can find most of these items at home or in a local store. These supplies help you create small motors for projects that really work.
Essential Tools
Here’s what you’ll need for your simple electric motor:
Copper wire (magnet wire works best for small motors for projects)
Insulated wire (for safe connections)
AA battery (you’ll need several for testing and longer runs)
Battery holder or sticky tack
Neodymium magnet (small disc magnets are perfect)
2 large paper clips
Black permanent marker
Scissors
Pen or pencil
Large rubber band (if you don’t use a battery holder)
Safety pins or screws
Wood block (for a sturdy base)
Copper wire is the star of the show. It has high electrical conductivity, so your small motors for projects run efficiently. Copper wire also resists overheating and lasts longer than other metals. When you use insulated wire, you protect your hands and make sure the current flows only where you want it. The aa battery gives your motor the power it needs. A neodymium magnet creates a strong magnetic field, which helps your motor spin.
Tip: Store your copper wire and insulated wire in a dry place. Keep your aa battery away from heat. Always recycle copper wire and batteries when you finish your project.
INEED Micro Motor Features
If you want to take your small motors for projects to the next level, check out INEED micro motors. These motors fit into tight spaces and deliver high torque, so you can build more advanced models. INEED micro motors run quietly and let you customize speed or torque for your project. They’re affordable, so you don’t have to worry about your budget. You can use them for DIY experiments or classroom activities. INEED micro motors make small motors for projects simple and fun.
Feature | Benefit for Projects |
|---|---|
Compact Size | Fits in small designs |
High Torque | Lifts or locks with ease |
Quiet Operation | No loud noise |
Customization | Adjust gear ratio, torque, or speed |
You can learn more about INEED micro motors and find the right one for your next project on their official website.
How to Build a Simple Motor
Make a Simple Electric Motor: Step-by-Step
Ready to make a simple electric motor? You can follow this step-by-step guide to build a motor that really spins. This project helps you see how electricity and magnetism work together. Let’s get started!
Gather Your Materials
Collect copper wire, two large paper clips, a neodymium magnet, an AA battery, a battery holder or sticky tack, a wood block, sandpaper, and a black marker. You’ll also want scissors, a pen or pencil, and some insulated wire.Making the Wire Coil
Cut about 30 cm of copper wire. Wrap the wire around a pen or pencil about 10 times to form a neat coil. Leave about 3 cm of wire sticking out from each end. This coil will act as the armature for your simple motor.Prepare the Coil Ends
Use sandpaper to remove the enamel from only one side of each wire end. This step is important. It lets electricity flow through the coil at just the right time, making the motor spin.Build the Supports
Unfold two paper clips into “U” shapes. Attach them to the wood block using sticky tack, safety pins, or screws. These will hold the coil in place and let it spin freely.Assembling the Motor
Place the coil between the paper clip supports. Make sure the coil can spin easily. Put the neodymium magnet right under the coil. The magnet’s strength will help your simple electric motor work better. Stronger magnets give your motor more torque and help it spin faster.Connect the Battery
Attach the ends of the paper clips to the battery using insulated wire. You can use a battery holder or a large rubber band to keep everything in place. Double-check your connections before you test the motor.Test Your Motor
Give the coil a gentle push. If you’ve followed the steps, the coil should start spinning. You just made a simple electric motor! If it doesn’t spin, check your connections and make sure you sanded the wire ends well.
Tip: When making the wire coil, keep the loops tight and even. If the coil wobbles or rubs against the supports, your simple motor may not work. Try to wrap the wire neatly and balance the coil for the best results.
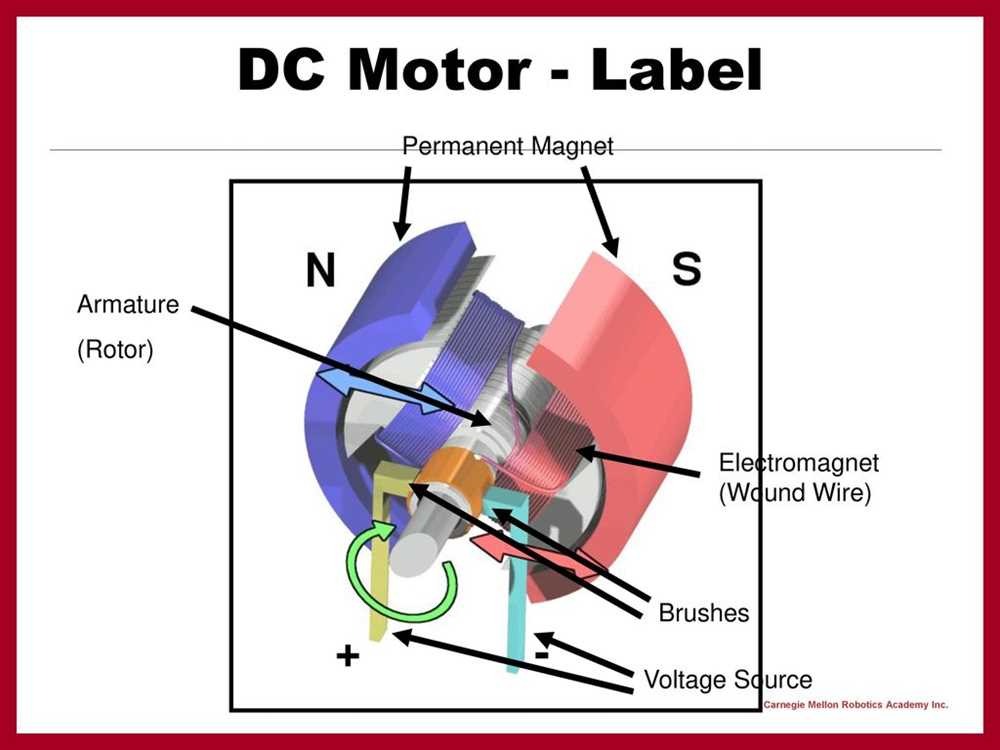
The science behind your simple electric motor is pretty cool. When electricity flows through the copper wire, it creates a magnetic field. This field interacts with the magnet under the coil. The forces push against each other, causing the coil to spin. You can see electromagnetism in action every time you build a motor like this.
If you want to go beyond homemade motors, you can try INEED micro motors. These motors are efficient, reliable, and easy to customize for any project. Check out the table below to see how they compare to a simple electric motor you build at home:
Feature | INEED Micro Motors | Homemade Simple Electric Motors |
|---|---|---|
Efficiency | High efficiency, little waste | Varies, often less efficient |
Reliability | Built for specific uses | Depends on how you build it |
Size | Compact and lightweight | Usually larger and bulkier |
Maintenance | Needs regular care (brushed) | Varies, often less maintenance |
Torque at Low Speeds | Limited at slow speeds | Can provide more torque |
INEED micro motors make assembling the motor for advanced projects much easier. You can adjust speed, torque, and size to fit your needs. If you want to build a motor for robotics or electronics, these motors are a great choice.
Safety Tips
Building a simple electric motor is fun, but you should always stay safe. Here are some important tips to keep in mind:
Always use insulated wire for connections. This keeps you safe from accidental shocks.
Don’t touch live wires. Make sure the battery is disconnected when you adjust the motor.
Avoid overloading your circuit. Don’t use more batteries than needed, or you could damage your simple motor.
Keep your workspace dry and clean. Water and electricity don’t mix.
If you use tools like wire strippers or a hot glue gun, ask an adult for help.
Make sure your connections are tight. Loose wires can cause the motor to stop or overheat.
Never put magnets near electronic devices or credit cards.
Note: Many beginners forget to double-check their connections or skip sanding the wire ends. These small mistakes can stop your simple electric motor from working. Take your time with each step and ask for help if you need it.
Common mistakes when assembling the motor include making bad connections, using too little wire for the coil, or letting the coil rub against the supports. If your simple motor doesn’t spin, check these areas first.
You can make a simple electric motor safely and have fun learning about science. If you want a motor that’s even more efficient and reliable, try INEED micro motors for your next project. They’re perfect for anyone who wants to build a motor that works every time.
Troubleshooting Simple Electric Motor Projects
Common Issues
Sometimes your simple electric motor just won’t spin, or it moves weakly. Don’t worry—these problems happen to everyone. Here’s a quick table of common issues and what they mean:
Issue | Description |
|---|---|
Water ingress | Water inside the motor can cause short circuits or even burn out the motor. |
Overheating | The motor gets too hot if it’s too small for the job or lacks cooling. |
Bearing failure | Wrong or worn-out bearings can stop the motor from spinning smoothly. |
Burnt windings | Short circuits in the coil or battery can burn the wire inside the motor. |
Dust ingress | Dust can cause short circuits, so keep your workspace clean. |
Running in reverse | If your motor spins the wrong way, switch the battery leads to fix it. |
If your motor doesn’t spin, try these steps:
Check the bearings. Make sure they aren’t rusty or stuck.
Briefly add power and listen for odd noises or sparks.
Use a multimeter to check for shorts or open circuits in the wires.
Inspect the switch or connections for wear or damage.
Test the battery or capacitor for leaks or bulges.
Tip: Keep your motor dry and clean. Even a little water or dust can cause big problems!
Tips from INEED
You can get more from your motor by following a few expert tips. INEED recommends regular maintenance to keep your motor running longer. Watch your voltage—too much power can shorten the motor’s life. Balance torque and speed for your project’s needs. Try using control techniques like Pulse Width Modulation (PWM) for better precision. Feedback systems help you make real-time adjustments and boost performance.
Need more help? INEED offers support for setup and maintenance, plus tools like multimeters and thermal cameras for troubleshooting. Their team can guide you on preventing overheating and making sure your motor stays aligned. If you ever get stuck, you’re not alone—INEED’s experts are ready to help you succeed!
You learned how to build a simple electric motor by preparing the coil ends, balancing the coil, and troubleshooting for better performance. Try new modifications like stronger magnets or custom brushless motors. For advanced projects, INEED micro motors offer customization, modular design, and precision control:
Feature | Benefit |
|---|---|
Customization | Tailor speed and power |
Modular Design | Easy system integration |
Precision Control | Accurate movement |
Versatility | Fits many applications |
Hands-on projects spark curiosity and build confidence. Keep experimenting—your next idea could lead to something amazing!
FAQ
How long does it take to build a simple electric motor?
You can finish your first motor in about 30 minutes. If you try new designs, you might spend more time experimenting and improving.
Can I use INEED micro motors for school projects?
Absolutely! INEED micro motors work great for science fairs, robotics, and DIY experiments. You get reliable performance and easy customization for any project.
Why won’t my homemade motor spin?
Check your coil ends. Make sure you sanded them well. Tighten all connections. Try a fresh battery. Sometimes a small adjustment gets your motor spinning!
See Also
Understanding Vibration Motors: Varieties, Uses, And Choosing Wisely
Identifying And Fixing Frequent Problems With 3 Volt Motors
Choosing Electric Motor Batteries: Efficiency, Use Cases, And Performance
Maintaining Electric Vibration Motors: Boosting Longevity And Efficiency
Get Custom Micro DC Motors from
INEED Motors!
Leading Brand in Vibration Motor Manufacturing Industry