3 Easy Ways to Drive Vibration Motor with Arduino

If you want to use a Drive Vibration Motor with your Arduino or Arduino Genuino Uno, you have some easy choices. Most people use a simple transistor switch. Some use a direct connection for very small Drive Vibration Motors. Others use a motor driver module to control the vibration. You can use your microcontroller to create fun vibration effects if you follow this guide. Always check the current limits. Use the right circuit. Protect your Arduino and the Drive Vibration Motor. This guide is simple so you can make real projects with your Arduino or Genuino.
Use a transistor or MOSFET switch for most Drive Vibration Motors.
Try a direct drive only for very small Drive Vibration Motors.
Use a motor driver module for more control.
Safety tip: Always check your circuit and wires before turning it on!
Key Takeaways
Use a transistor switch for most vibration motors. This keeps your Arduino safe. You can also control vibration strength with PWM.
Direct drive only works for very small motors under 20mA. It is best for quick tests. Do not use it for permanent projects.
Motor driver modules are the safest and most advanced way to control motors. They have built-in effects. They cost more and need extra libraries.
Always check your wiring. Use the right power source. Add a flyback diode to protect your Arduino and motor.
Pick the method that fits your project needs. Think about safety, control features, and cost.
1. Direct Drive
Direct drive is the easiest way to connect a vibration motor to your Arduino. You connect the motor right to a digital pin and ground. This way only works for very tiny motors that use less than 40mA. Most vibration motors need more power, so always check the current before you try this.
What You Need
Arduino board (like Uno)
Small vibration motor (less than 20mA is best)
Jumper wires
Breadboard (you can use one)
Multimeter (to check current)
Tip: Always use a multimeter to see how much current your motor uses. If it uses more than 20mA, do not use direct drive. The Arduino pin can handle up to 40mA for a short time, but 20mA is safer for normal use. Too much current can break your Arduino.
Wiring
Follow this easy wiring diagram:
[Arduino Pin 9] ---- [Vibration Motor] ---- [GND]
Connect one wire from the vibration motor to digital pin 9.
Connect the other wire from the motor to GND on the Arduino.
Note: This wiring is only for very small motors. If your motor is bigger, use a transistor switch instead.
Code
Here is a simple arduino code to turn the vibration motor on and off:
// Basic Arduino example code for direct drive
int motorPin = 9;

void setup() {
  pinMode(motorPin, OUTPUT);
}

void loop() {
  digitalWrite(motorPin, HIGH); // Turn motor ON
  delay(1000);                  // Wait 1 second
  digitalWrite(motorPin, LOW);  // Turn motor OFF
  delay(1000);                  // Wait 1 second
}
You can change the pin number or the delay to match your project. This code makes the motor vibrate for one second, then stop for one second.
Pros & Cons
Pros:
Very easy circuit and connections
No extra parts needed
Simple to test with example code
Cons:
Only safe for very small motors
You might damage Arduino pins if current is too high
No protection from voltage spikes or back-EMF
Not good for permanent projects
If you want a safe and strong vibration motor circuit, use a transistor or a motor driver. Direct drive is only for quick tests with tiny motors.
2. Transistor Switch
A transistor switch is the safest way to control a vibration motor with Arduino. This setup lets you use bigger motors. You can also add an outside power source. PWM lets you change how strong the vibration feels. This method keeps your Arduino safe from harm.
What You Need
Here is a simple list of what you need:
Arduino board (Uno or similar)
Vibration motor (any small DC type)
NPN transistor (TIP120 or 2N2222 are good picks)
Flyback diode (like 1N4007 or 1N5819)
1kΩ resistor (for the transistor base)
Breadboard and jumper wires
Outside power source (like a 5V battery pack) if your motor needs more power
Tip: TIP120 is good for bigger motors. 2N2222 works well for small ones.
Wiring
Use this diagram to make safe connections:
[Arduino Pin 9] --[1kΩ Resistor]--> [Transistor Base]
[Transistor Emitter] --> [Arduino GND]
[Transistor Collector] --> [Motor -]
[Motor +] --> [Power +]
[Flyback Diode] across motor terminals (cathode to +)
Connect the Arduino pin to the transistor base with the resistor.
The emitter goes to Arduino GND.
The collector connects to the motor’s negative side.
The positive side of the motor goes to the power supply.
Put the diode across the motor to stop voltage spikes.
The flyback diode keeps your Arduino and transistor safe. It blocks voltage spikes from the motor.
Code
Here is a simple arduino code to control the motor. PWM lets you change how strong the vibration is:
// Example code for transistor switch with PWM control
int motorPin = 9; // Must be a PWM-capable pin

void setup() {
  pinMode(motorPin, OUTPUT);
}

void loop() {
  analogWrite(motorPin, 128); // Set vibration to half strength
  delay(1000);                // Run for 1 second
  analogWrite(motorPin, 0);   // Turn motor off
  delay(1000);                // Wait for 1 second
}
You can pick any number from 0 to 255 in analogWrite. This changes how strong the vibration feels. This code makes it easy to try different effects.
Pros & Cons
Pros:
Works with almost any vibration motor
Keeps your Arduino and circuit safe
Lets you use outside power for more motors
Easy to change vibration strength with code and PWM
Simple wiring and clear example
Cons:
Needs a few extra parts
You must check your connections and diode direction
If you want safe and flexible control, this is the best way for most Arduino projects.
3. Motor Driver Module
Motor driver modules help you control vibration motors with Arduino easily. You do not need to make a hard circuit or worry about mistakes. These modules, like the Adafruit DRV2605L or L9110, are ready to use. They give you more ways to control your motor. You can make fun vibration patterns or use more than one motor. If you want haptic feedback in your project, this is a good choice!
What You Need
Here is a short list to help you start:
Arduino board (Uno, Nano, or similar)
Motor driver module (Adafruit DRV2605L, L9110, or similar)
Vibration motor (LRA or ERM type)
Jumper wires
Breadboard (optional for easy setup)
Tip: The DRV2605L works with both LRA and ERM motors. It uses I2C to connect to Arduino. It also has built-in vibration effects!
Wiring
Wiring is very simple with a motor driver module. Most modules only need a few wires. For the DRV2605L, connect SDA and SCL to Arduino’s I2C pins. Connect power (3-5V) and ground. Then, connect your vibration motor to the module’s output.
SDA → Arduino SDA
SCL → Arduino SCL
VIN → 3V or 5V on Arduino
GND → GND on Arduino
Motor wires → Module output terminals
Note: You do not need extra diodes or resistors. The module keeps your parts safe!
Code
You can use example code from the Arduino library for your motor driver module. Here is a simple code for the DRV2605L:
#include <Wire.h>
#include <Adafruit_DRV2605.h>

Adafruit_DRV2605 drv;

void setup() {
  drv.begin();
  drv.selectLibrary(1);
  drv.setMode(DRV2605_MODE_INTTRIG);
}

void loop() {
  drv.setWaveform(0, 47); // Play strong click effect
  drv.setWaveform(1, 0);  // End of sequence
  drv.go();
  delay(1000);
}
You can change the waveform number to try new vibration effects. The code is simple and lets you control the motor with just a few lines.
Pros & Cons
Pros:
Very easy wiring and setup
Advanced control with built-in effects and PWM
Some modules can run more than one motor
Good for projects that need haptic feedback
Example code and libraries are ready for Arduino
Cons:
Modules cost more than simple circuits
You need to add a library for the code
If you want the easiest and strongest way to control vibration motors with Arduino, use a motor driver module!
Comparison Table
If you want to drive vibration motor with Arduino, you have three main ways. Each way has good and bad points. Let’s look at how they are different so you can choose the best one for your project.
Here is a table that shows how direct drive, transistor switch, and motor driver module compare when you drive vibration motor:
Method | Safety Level | Ease of Use | Cost (Parts Only) | Control Features |
|---|---|---|---|---|
Direct Drive | ❌ Risky for Arduino | ✅ Very Simple | $0 (just wires) | On/Off only, no fine control |
Transistor Switch | ✅ Safe with diode | 👍 Easy | ~$0.10 - $0.50 | On/Off and PWM for vibration control |
Motor Driver Module | 🏆 Safest (protected) | 👍 Simple wiring | $0.32 - $10.75 | Advanced control, built-in effects, multiple motors |
The motor driver module keeps your Arduino safest and gives you the most control. It costs more, but you get extra features like overcurrent and heat protection. If you want to drive vibration motor with special effects, this is the best choice.
Here is a chart that shows how much different motor driver modules cost when you drive vibration motor:
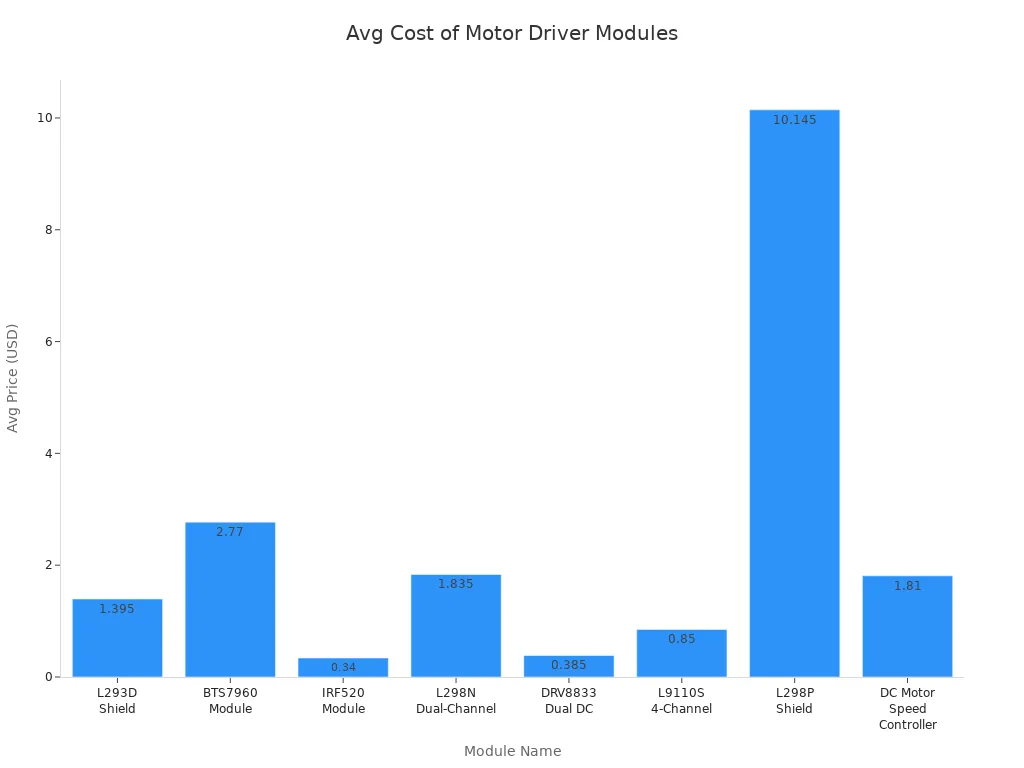
Direct drive is almost free, but it can hurt your Arduino. The transistor switch is cheap and lets you use PWM for better control. You can change how strong the vibration feels. The motor driver module costs more, but it is the safest and gives you the most ways to drive vibration motor.
Important things to think about when you drive vibration motor:
Safety: Motor driver modules keep your Arduino safe from harm.
Control: PWM lets you change how strong the vibration is. Motor driver modules give you even more control, like built-in patterns.
Cost: Direct drive is the cheapest, but not safe. Transistor switches are cheap and safe. Motor driver modules cost more but have the best features.
Motor type: Some modules work with both ERM and LRA motors.
If you only need simple on/off, use direct drive or a transistor switch. If you want to drive vibration motor with cool effects or more than one motor, use a motor driver module.
Arduino Tutorial: Troubleshooting
Common Issues
When you follow an Arduino tutorial to drive a vibration motor, you might run into a few problems. Here are some of the most common issues people face:
The motor does not run at all when you upload your code.
The motor feels weak or does not vibrate as strongly as expected.
Your Arduino resets or acts strange when the motor turns on.
The motor sometimes fails to start after turning it off and on quickly.
You hear buzzing or see the Arduino lights flicker.
The motor only works if you tap it or wiggle the wires.
The code works, but the motor gets hot or stops after a while.
Many beginners make mistakes like using the wrong pin, missing a ground connection, or trying to power the motor directly from the Arduino 3.3V pin. These mistakes can cause weak vibration or even damage your board.
Solutions
You can fix most problems by following these simple steps:
Check Your Wiring
Make sure every wire is in the right place. Double-check the ground and power connections. If you use a transistor or driver, confirm the collector, base, and emitter are correct.Use the Right Power Source
Do not power the motor from the Arduino 3.3V or 5V pin. Use an external battery or power supply for the motor. This keeps your Arduino safe and gives the motor enough current.Add a Flyback Diode
Always put a diode across the motor terminals. This protects your Arduino from voltage spikes that can reset your board or damage it.Test the Motor Alone
Disconnect the motor from your circuit and connect it directly to a battery. If it still does not run, the motor might be broken.Check Your Code
Try longer delays in your code, likedelay(1000), to help the motor start. Make sure you use the correct pin number in your code.Measure Current and Voltage
Use a multimeter to check if the motor gets enough voltage and current. If not, your power supply may be too weak.Look for Overheating
If the motor or Arduino gets hot, stop and check your wiring and code. Too much current can damage your parts.
If you follow each step in this tutorial, you can solve most vibration motor problems with Arduino. Always check your code and wiring before trying again!
You have learned three ways to use a vibration motor with Arduino or genuino. Each way is different for safety and control. The transistor switch is best for most people. It keeps your microcontroller safe and works well. If you want more options, use a motor driver module. For cool haptic feedback, try using PWM or connect your microcontroller to new software. Need help? You can join groups like DeepBlueMbedded.com or ask your questions below!
FAQ
How do I know if my vibration motor is too big for direct drive?
You can check the motor’s current with a multimeter. If it uses more than 20mA, do not connect it straight to your Arduino. Use a transistor or a motor driver module for safety.
Can I control the vibration strength with Arduino?
Yes! You can use PWM (pulse-width modulation) in your code. This lets you change how strong the vibration feels. Just use the analogWrite() function on a PWM-capable pin.
Why does my Arduino reset when the motor turns on?
This usually means the motor draws too much current from the Arduino. Try using an external power supply for the motor. Always add a flyback diode to protect your board from voltage spikes.
Do I need a special motor driver for every vibration motor?
No, you do not need a special driver for every motor. Most small DC vibration motors work with a simple transistor switch. If you want advanced effects or use more than one motor, a motor driver module helps a lot.
Can I use the same code for different vibration motors?
You can use the same basic code for most small DC vibration motors. If you use a motor driver module, you might need to add a library or change a few lines. Always check the example code for your module.
See Also
Simple Guide To Become Skilled With Arduino Vibration Motors
Adjusting Vibration Motor Strength Using Arduino PWM Techniques
Top Ten High-Performance Vibration Motors For Arduino Builds
Understanding The Vibration Mechanism Of 3V DC Motors
Advantages And Drawbacks Of 12V Vibration Motors For Medium Power
Get Custom Micro DC Motors from
INEED Motors!
Leading Brand in Vibration Motor Manufacturing Industry