How to Control Vibration Motor Intensity with Arduino PWM

You can control a vibration motor's intensity using Arduino. This is achieved by adjusting the duty cycle of the signal sent to the motor. First, connect the vibration motor to a PWM pin on the Arduino Uno. Then, upload a code to modify the duty cycle and test it. When the duty cycle is higher, the vibration motor produces stronger vibrations. A weak vibration measures about 1.56 g, while a strong one reaches 2.26 g. By fine-tuning the duty cycle, you can control the vibration motor to achieve the desired strength for your project.
Key Takeaways
Change how strong the motor vibrates by adjusting PWM duty cycle. Higher duty cycles make stronger vibrations.
PWM works better than using direct voltage. It saves energy and keeps the motor steady even with changing loads.
Use key parts like Arduino, MOSFET, and flyback diode to build the circuit safely.
Test the motor by slowly raising the duty cycle. Start small and adjust to find the best vibration strength for your project.
Check the motor for overheating. Lower the duty cycle if it gets too hot. Make sure the motor isn’t overloaded or stuck.
Understanding PWM for Vibration Motor Control
Basics of PWM and its role in motor control
PWM, or pulse width modulation, controls power to devices like motors. Instead of steady voltage, it sends quick on-off pulses. The length of these pulses is called the duty cycle. A 50% duty cycle means the motor gets power half the time. This creates medium vibration strength.
PWM is great for motor control because it’s very precise. Changing the duty cycle between 60% and 90% adjusts speed and vibration. This works well because motors respond to the average power of the pulses.
Aspect | Description |
|---|---|
Duty Cycle | How long each pulse lasts decides the motor's power. A 50% duty cycle gives 50% average power. |
Modulation Process | Changing pulse width changes the motor's average power. |
Efficiency | PWM makes less heat than other methods, saving energy. |
Torque Control | PWM helps motors keep steady torque at different speeds. |
PWM saves energy by making less heat than other methods. It also keeps torque steady, even at different speeds. This makes it great for projects needing stable performance.
Why PWM is better than direct voltage control for vibration motors
PWM is better than direct voltage control for motors. Direct voltage changes motor speed by adjusting voltage levels. But this wastes energy as heat and is less efficient. PWM sends short bursts of power, saving energy.
Feature | PWM Speed Regulation | Voltage Control Speed Regulation |
|---|---|---|
Efficiency | Very efficient, little energy wasted | Less efficient, energy lost as heat |
Speed Range | Wide, stable speed range | Limited range, struggles at low speeds |
Stability | Stays stable even with load changes | Unstable, affected by load changes |
Complexity | Needs advanced circuits | Simple, no advanced circuits needed |
Cost | Costs more, good for high performance | Cheaper, good for basic uses |
PWM keeps motor performance steady, even with changing loads. This is helpful for vibration motors, which face resistance changes. Though PWM circuits are more complex, they give full torque from zero to top speed. This makes them the best choice for high-performance needs.
Using PWM lets you control vibration strength, save energy, and keep things stable. These advantages make it the top choice for modern motor control projects.
Components and Circuit Setup to Drive a Vibration Motor
Essential components for the setup
To use Arduino with a vibration motor, you need some parts. Each part helps the motor work well and follow PWM signals. Here's a simple list of what you need:
Specification | Details |
|---|---|
Operating Voltage | Usually 1.5V to 3V |
Current Consumption | 60mA to 100mA |
Vibration Amplitude | Depends on motor size/speed |
Speed | 10,000 to 15,000 RPM |
Lifetime | 100-1000 hours of use |
You’ll also need these items for the circuit:
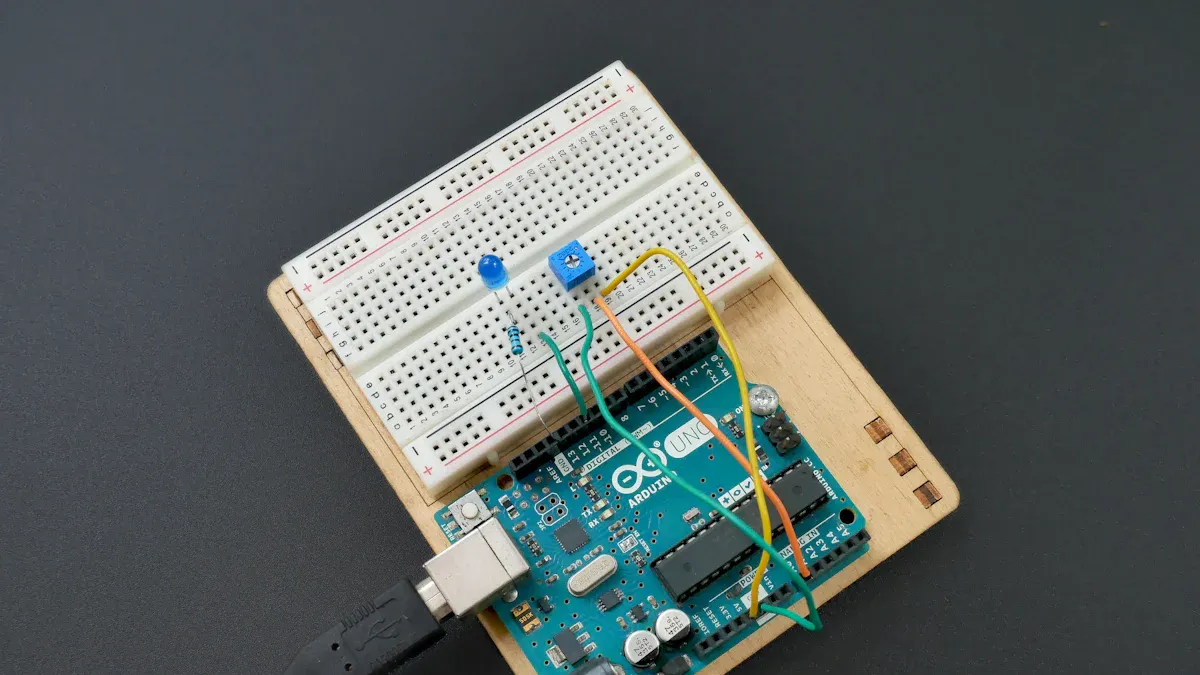
Microcontroller: Arduino Uno to send PWM signals.
Transistor: An N-type MOSFET like 2N7000 to boost the signal.
Vibration Motor: A small motor for vibration, linked to the MOSFET.
Power Source: A battery or supply matching the motor's voltage.
Resistors: To control current and protect the circuit.
Diode: A flyback diode to stop voltage spikes when the motor shuts off.
These parts help the motor run safely and respond to PWM signals.
Tip: Always check the motor's details before connecting it. Using the wrong voltage or current can break the motor.
Step-by-step guide to wiring the circuit
Follow these steps to connect the circuit and control a vibration motor with Arduino:
Set up the Arduino and MOSFET:
Link the MOSFET to the Arduino. Connect the MOSFET's gate pin to a PWM pin on the Arduino (like pin 9). This lets the Arduino send signals to the MOSFET.Attach the vibration motor:
Connect the motor's positive side to the power source. Link the negative side to the MOSFET's drain pin. This way, the motor gets power when the MOSFET turns on.Add a flyback diode:
Place a diode across the motor terminals. Make sure the marked end (cathode) points to the positive terminal. This stops voltage spikes from harming the circuit.Use a resistor:
Put a resistor between the Arduino's PWM pin and the MOSFET's gate pin. This protects the Arduino by limiting current to the MOSFET.Connect the power source:
Attach the power source to the motor and Arduino. Make sure the voltage matches the motor's range (1.5V to 3V).Test the circuit:
Upload a simple PWM code to the Arduino. Slowly increase the duty cycle to test the motor's vibration. If the motor buzzes or doesn’t start, check the wiring and adjust the PWM settings.
Note: Wrong wiring can cause buzzing or overheating. Check all connections and make sure your code matches the setup.
By following these steps, you can control a vibration motor using Arduino PWM. This setup lets you change the motor's strength by adjusting the duty cycle.
Arduino Code to Control Vibration Motor
Example code for PWM-based motor control
Here’s a simple code to control a vibration motor. It uses PWM to change the motor's strength by adjusting the duty cycle.
// Set the PWM pin connected to the MOSFET gate
const int pwmPin = 9;

void setup() {
  // Make the PWM pin an output
  pinMode(pwmPin, OUTPUT);
}

void loop() {
  // Slowly increase the duty cycle from 0% to 100%
  for (int dutyCycle = 0; dutyCycle <= 255; dutyCycle++) {
    analogWrite(pwmPin, dutyCycle); // Send PWM signal
    delay(10); // Pause for 10ms
  }

  // Slowly decrease the duty cycle from 100% to 0%
  for (int dutyCycle = 255; dutyCycle >= 0; dutyCycle--) {
    analogWrite(pwmPin, dutyCycle); // Send PWM signal
    delay(10); // Pause for 10ms
  }
}
This code uses analogWrite() to send PWM signals. The motor's vibration changes smoothly as the duty cycle increases or decreases.
Explanation of code functionality
The code works by sending PWM signals from pin 9 on the Arduino. These signals control how strong the motor vibrates. Here’s how it works:
Setup Phase:
Thesetup()function sets pin 9 as an output usingpinMode(). This lets the Arduino send signals to the motor through the MOSFET.Generating PWM Signals:
Theloop()function has twoforloops. The first loop raises the duty cycle from 0 to 255. The second loop lowers it back to 0. TheanalogWrite()function sends these signals, where the value (0–255) sets the duty cycle (0%–100%).Motor Response:
The motor vibrates based on the PWM signal. A higher duty cycle makes stronger vibrations. A lower duty cycle makes weaker vibrations. This happens because the ON and OFF times of the signal change.Smooth Changes:
Thedelay(10)command adds a short pause between each duty cycle step. This pause ensures smooth vibration changes, avoiding sudden jumps that might harm the motor.
Tip: Change the
delay()value to adjust how fast the vibration changes. A smaller delay makes quicker changes, while a larger delay slows them down.
Using PWM is a smart way to control vibration motors. It saves energy and avoids overheating. This method is perfect for projects needing precise control, like robots or wearable devices.
Performance Metrics and Testing Results
The Arduino PWM code was tested for performance. The table below shows the results:
Metric/Result | Description |
|---|---|
Model Estimation Accuracy | The model fits well with over 90% accuracy. |
Controller Design | A controller was made using a linearized ARX model. |
Simulation vs. Hardware Response | The hardware works almost the same as the simulation. |
Tracking Performance | The controller tracks commands well, just like in the simulation. |
These tests show that PWM control is reliable and works well. The hardware behaves like the simulation, making it great for real-world use.
By using this code and guide, you can easily control a vibration motor. This setup is flexible and works for many projects, like haptic feedback or robotics.
Adjusting Vibration Motor Intensity with Duty Cycle

How duty cycle changes affect motor intensity
The duty cycle is key to controlling how strong a vibration motor vibrates. It decides how much power the motor gets during each PWM signal cycle. A higher duty cycle means the motor gets power longer, making stronger vibrations. A lower duty cycle gives less power, causing weaker vibrations.
For example, a duty cycle of 25% powers the motor for one-fourth of the time. This creates a soft vibration. A duty cycle of 75% powers it for three-fourths of the time, making stronger vibrations. You can adjust the duty cycle to match your project’s needs.
The PWM frequency also affects the motor’s behavior. At 20Hz, the motor starts spinning at about 0.5 volts. Higher frequencies need more voltage to start spinning. For smoother vibrations, use a frequency of 400Hz. This reduces noise and keeps the motor running smoothly. Balancing the duty cycle and frequency helps avoid mechanical problems.
Practical tips for fine-tuning vibration levels
To adjust vibration levels, you need to change both the duty cycle and PWM frequency. Here are some simple tips:
Start with a low duty cycle: Begin testing at 10%. Slowly increase it to find the best vibration strength.
Pick the right PWM frequency: Use 400Hz for smooth vibrations. Avoid frequencies below 60Hz to prevent shaking.
Try decay modes: Slow decay modes with low frequencies improve motor performance at low speeds.
Watch for problems: Listen for strange noises or check for overheating. Adjust the duty cycle or frequency if needed.
Test in real conditions: Test the motor in the same environment it will be used to ensure it works well.
These tips help you control vibration motor strength. You can create steady vibrations that fit your project perfectly.
Troubleshooting Problems in Vibration Motor Control
Fixing wiring mistakes
Wiring mistakes happen often when using a vibration motor with Arduino. These errors can make the motor stop working or reset the circuit. To fix this, check all the connections carefully. Make sure wires are tight and soldered if needed. Loose wires can cause the motor to work unevenly.
Adding a capacitor can help steady the power supply. For example, a 0.1 µF capacitor across the Arduino's power pins can smooth out power drops. If the motor resets the system, replace it with a resistor to test the circuit. This helps find out if the motor is causing the issue. Also, use separate power sources for the Arduino and motor. This avoids voltage changes that might affect the Arduino.
Problem | Solution |
|---|---|
Power supply problems | Add a 0.1 µF capacitor. Solder power wires directly to the source. |
System resets when motor runs | Replace motor with a resistor to find the issue. Check circuit paths. |
Circuit resets at high current | Test if resets happen at 0.4A in motor circuits. |
Common motor issues | Use separate power for Arduino and motor. Check capacitor values for stability. |
Fixing Arduino code errors
Code mistakes can stop the motor from working properly. First, check your code for errors like wrong pin numbers or typos. Make sure the PWM pin in the code matches the one connected to the motor. Use Serial.print() to see what values are sent to the motor. This helps you find problems in the code.
If the motor doesn’t work, check the duty cycle values. They should be between 0 and 255. Wrong values can make the motor stop or vibrate oddly. Also, check the Arduino’s power supply. If it’s too weak, the PWM signals may not work right, affecting the motor.
Solving motor overheating or performance problems
Vibration motors can overheat if used for too long. To avoid this, check the motor’s temperature while it runs. If it gets too hot, lower the duty cycle to reduce power. This helps the motor cool down.
Make sure the motor isn’t overloaded. Too much load can make it overheat or wear out faster. Use a motor that fits your project’s needs. Also, check for anything blocking the motor’s movement. Dirt or misalignment can add resistance, causing overheating.
If the motor’s performance drops, inspect the wires and connections. Damaged or loose wires can lower power, reducing vibration strength. Clean the motor and check connections regularly to keep it working well.
Now you can control a vibration motor with Arduino PWM. Learn how PWM works, set up the circuit, and write code. This lets you change the motor's strength easily. Try different duty cycles to find the right vibration for your project. For instance, a study showed that changing vibrations affected stress levels. This proves how adjusting settings can create specific effects. Begin with small changes, test carefully, and enjoy this flexible method.
Tip: Watch the motor closely during testing to prevent overheating or damage.
FAQ
What is the best PWM frequency for vibration motors?
A 400Hz frequency gives smooth and steady vibrations. Lower frequencies, like 20Hz, can make the motor shake unevenly. Always check the motor's specs to ensure it works with your chosen frequency.
Can I use any vibration motor with Arduino?
No, the motor must match Arduino's power limits. Most small motors need 1.5V to 3V and use 60mA to 100mA. Check the motor's voltage and current needs before adding it to your circuit.
Why does my motor overheat during operation?
Motors overheat if run at high duty cycles too long. Lower the duty cycle or let the motor cool down. Make sure it’s not overloaded or blocked, as these can cause extra heat.
How do I know if my wiring is correct?
Compare your wiring to the circuit diagram. Ensure the MOSFET gate connects to the right PWM pin, and the flyback diode is placed correctly. Loose wires or wrong connections can cause buzzing, uneven vibrations, or resets.
Can I control multiple vibration motors with one Arduino?
Yes, you can control more than one motor. Connect each motor to its own PWM pin. Use separate MOSFETs and diodes for each motor. Make sure the Arduino and power supply can handle the total current for all motors.
See Also
Master Arduino Vibration Motors in Just Five Simple Steps
Controlling Resonance Frequency in Vibration Motors for Consistent Performance
Learn How 3V DC Motors Generate Vibrations Effectively
Understanding Vibration Motors for Effective Haptic Feedback Solutions
Get Custom Micro DC Motors from
INEED Motors!
Leading Brand in Vibration Motor Manufacturing Industry